How to make a Light Orb

Last time we talk about light painting and many people ask how I did the light orb. This is not a Photoshop effect, it’s created in the camera and is really easy to do. This type of photography is called “Light Painting” or “Light Graffiti”. For this specific effect we have to make our tools to create the light orb.
You will need the following item:
- LEDs bulb, you can use any LEDs but I use high intensity led
- 2.7 ohm 1/4 watt Resistor
- ON/OFF switch
- 9V battery
- cable
- Black Electrical Tape
Optional
- Battery Holder or battery plug
- 30 Watt Soldering Iron
Sorry foe the crappy picture I use my cell phone for that
Process
- The LEDs have two legs one longer than the other, to make a chain of LEDs you have to connect the longer leg of one LED to the short leg of another LED.
- When you finish with the chain of LEDs put the resistor in one of the legs.

- You can use the soldering iron to make sure that every connection stay in place but the electric tape work really good. Just make sure you use the tape to isolate every connection to avoid short-circuit.
- Here I make an electric diagram to show you the complete circuit. I use the Adobe Idea Iphone app for that. ”resistencia” mean resistor in Spanish, sorry for that.

You should finish with something like this, I make another version using a project box to put the battery and the switch and I use two 9V battery just for more juice. I have it since almost a year and I think it could last another year without changing the battery.


Now to make the light orb you need to remember those days when you were a kid and play with a rope like a cowboy. Mark a spot in the floor and let your inside cowboy out and start making some circle but making sure they all pass the spot on the floor. You soon figure it out how to do it right.
If you make some light painting put the link in the comment
Now go out and shoot!
My Review of Nikon 70-200mm f/2.8G AF-S VR II Zoom-Nikkor ED-IF Lens - Black Finish - by Nikon U.S.A.
Originally submitted at Adorama
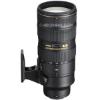
Nikon 70-200mm f/2.8G AF-S VR II Zoom-Nikkor ED-IF Lens - Black Finish - by Nikon U.S.A.
Just perfect
Pros: Strong Construction, Nice Bokeh, Fast / accurate auto-focus, Consistent Output, Easily Interchangeable, Durable
Cons: Heavy
Best Uses: Wildlife Photos, Indoors/Low Light, Sports/Action, Weddings/Events
Describe Yourself: Pro Photographer
Was this a gift?: No
I love this lens it work really good its one of my favorite. Is awesome in low light situation like wedding and other event, it’s perfect for portrait and fashion shoot, the bokeh is really beautiful and provide a good separation of the subject. The focal range its nice for taking candid shoot from a good distance, like some sort of ninja. The quality of the image produce with this lens is outstanding and really sharp. The focus is really quiet and fast making this also a perfect lens for sports. The VR of this lens is amazing, I can easily use 1/40 sec at 200mm handheld without camera shake, in a good day I can reach the 1/15.
The only cons that I found its that this baby is heavy and I recommend using some kind of strap like the black rapid strap to avoid the pain in the neck that this lens would cause.
(legalese)
Photoshop file set up
We all know how messy Photoshop can be when we use a lot of layers. That’s why I make this CS5 action to keep things organized and create a workflow. This action is divided in specific tasks I do during my retouching workflow and now I’m sharing it with you. This is not the absolute correct way of doing it but its my way and I hope that it helps.
Now run the action by pressing the play button on the action palette or just press F2 (The F2 its a custom setting and I don’t know if is exported in the action, if F2 works for you let me know if not just run the action as always)
As you can see now, you have some folders and layers that start with the original file because I like to work in a non destructive way just in case I mess things up.
- We have a Liquify group with a copy of the original also named Liquify. Probably you have already guess it, in this layer I use the Liquify filter if needed but I also use the lens correction filter. Here I make my horizon correction, that 95% of the time I have it wrong. And also I make the lens correction in this layer, it’s not crucial but I like to do it.
- Then we have the pixel layers, here I make all of the pixel editing like cloning, healing and anything that have to do with manipulating pixel. There is a subject and background layers, you can add more layers as needed, just remember to change the name of the layer to the specific part that you are working. In here I run two actions that I made, one for retouching the eyes and another one to retouching the skin. I will make another tutorial with this two actions so stay tune.
- Color correction folder, here are two adjustment layers that I use to create contrast and more vivid color, because the white balance its done in Lightroom in the RAW processing. But you can make the color correction also in this group.
- This is one of my favorites, the dodge and burn step. Here you find three layers and two method to do the dodge and burn. The first method its using a 50% grey layer, just paint white to burn and black to dodge. Now the second method its my favorite because theres no way you can mess it up with this. Paint in the layer mask with white and thats it. Why I use the curve layer to do the dodge and burn? Because you can adjust the curve to your liking and there is no way that you can go too far with it, set the limit you want for the highlight and shadows and you are done.
- The noise group, here you can use the noise reduction method of your choice, thats why the folder is empty. I make a new layer with a flatten version (crtl+alt+shift+E) and run the noise ninja plug-in.
- For the sharpening its up to you because that depends for what its the use you are going to give to the file.
That’s it! Thats my typical retouching workflow in Photoshop. I hope that this little action helps you to create an organized workflow or inspire you to make up your action.
Now go out and shoot! Well… in this case just go and use Photoshop

Light Painting
Last time I talk about long shutter speed, there are some thing that you can do with long exposure. Its called light painting or light graffiti, this technique require the use of some light emitting device such as flashlight, led, etc.
In a dark environment set the camera for a long exposure (use a tripod) and start drawing in the air with a littler flashlight, thats why its called light painting because you can actually paint with light.
Here are some great example of light painting.
Cool video made with light painting
Now go out and Shoot!
Long exposure photos

Long exposure photography is using a long duration shutter speed to capture the stationary elements of images while blurring or obscuring its moving elements. Long exposures are easiest to accomplish in low-light conditions, but can be done in brighter light using neutral density filters. Long exposure photography is often used in the night in order to produce a near daytime effect in the photo. By leaving the camera’s shutter open for an extended period of time, more light is absorbed, creating a brighter product.
You need a tripod(need one?) to create a sharp photo and some moving subject to create a beautiful picture with some interest. If you don’t have a tripod you can use any hard surface like a table or something to stabilized the camera. In the above picture I use a wooden fence to stabilized the camera, an ISO setting of 100 for 30 second of exposure.
Try shooting in the night and you will be amazed with the result of long exposure photography and believe me its really worth it.
Now go out and shoot!
How to select the best ISO setting
The ISO in the camera control how sensitive is the sensor to the light. You can make a search to learn more about how the sensor works. This article is more about how to used it to take better pictures.
In most camera the ISO start at 100, the lowest the number the less sensitive is to the light and the opposite, the bigger the number the more sensitive is to the light. But using big ISO make you camera to produce noise in the picture.
In film photography you have grain and its quite an style, but in digital photography noise it seen with bad eyes.
The trick to select the best ISO possible for your photography its knowing the three aspect of exposure. Aperture, shutter speed and ISO. Example if you are in a low light room and the depth of field its not a problem, you have your aperture set to the biggest you have, and your shutter speed is as slow as possible without causing motion blur, and the photos are under expose then you can rise the ISO until you have a good exposure.
Remember a good exposure reduce the noise in high ISO and beside if the people notice the noise in your photos maybe you don’t have a strong picture. Be creative an use the noise to your advantage, start shooting and making good picture
Now go out and shoot!